環境設定
Incentives お客様の使用状況に基づいて最新のライセンス使用制限を正確に表示します。 権利 内で 環境設定お客様の利用状況に基づいて、請求可能な使用量の透明性を高めました。 ソフトウェアスケジュール契約。
ライセンスの使用状況を追跡するには、 環境設定 管理パネルにあるモデル ドロップダウンから選択します。
権利の使用状況のレポートと統計
Varicent Incentivesでは、スーパー管理者が以下を対象に、現在と過去のライセンス使用状況を個別に追跡および表示できます。
注記
[en] Non-production models do not affect your license usage, and any changes made with these models won't appear in Tenant settings.
管理者ユーザー
[en] These users are assigned admin licenses, allowing them to configure and manage the Varicent IncentivesVaricent Incentives Admin Client. They participate in the development and continuous management of the Varicent IncentivesVaricent Incentives compensation plans.
[en] To learn more, read: 管理ユーザーの追跡.
受け取り人ユーザー
[en] These users hold payee licenses as they participate in compensation programs overseen by Varicent IncentivesVaricent Incentives. Usually, they are employees or partners who earn compensation based on program criteria.
[en] To learn more, read: 受け取り人ユーザーの追跡.
インポートレコード
[en] Import records track the amount of data that you import or process each month within Varicent IncentivesVaricent Incentives, focusing on new rows from external imports into production models.
[en] To learn more, read: インポートレコードの追跡.
注記
[en] An individual can hold both admin and payee licenses.
[en] For example, someone managing the Varicent IncentivesVaricent Incentives system and involved in a compensation program might have separate Admin Client and Sales Portal accounts for each role, even if they use the same email address. These accounts have different credentials to reflect their specific functions.
管理ユーザー、受け取り人ユーザー、インポートレコードの数の使用状況履歴を追跡し、使用状況の傾向を特定できます。使用状況と制限を表示する権限を有効にすると、使用状況情報に個別にアクセスできます。
注記
[en] Admins will receive notification banners when their license usage reaches 85% and 95%, and when these limits are exceeded for: admin licenses, import record usage, and payee licenses.
[en] Once you reach a specific threshold, please contact your Customer Success Manager or Varicent Support to purchase additional licenses. If you're concerned about exceeding your limit, consider purchasing more licenses beforehand to prevent extra charges.
[en] Click the I acknowledge button in the notification banner to confirm that you've seen the notification banners, indicating your understanding of current usage and any required actions. To maintain an accurate record of actions, each acknowledgment of a license usage notification is logged in the Activity tab on the Admin user's page within Tenant settings. For ongoing monitoring, notifications will reappear based on set intervals: every 90 days for payee and admin usage, and every 7 days for import record usage, as long as usage exceeds thresholds.
権利権限の有効化
モデル設定で権利が有効になっている場合にのみ、使用状況情報にアクセスできます。
管理パネルから、[モデルの設定]
 をクリックします。
[ユーザーおよび権限] -> [ロールの権限]を選択します。
[権利]から、[使用状況と制限を表示]チェックボックスを有効にします。
管理ユーザーの追跡
[管理ユーザー]ページでは、環境とそのモデルの管理ユーザー数を追跡できます。環境の現在のモデルに登録されているすべての管理ユーザーについて、現在と過去の使用状況がすべて表示されます。
[en] The Manage Admins section on the Admin Users page serves as a one-stop location for overseeing and improving your admin resources in Varicent main: prod_name_title. As an admin, you can monitor license usage and have the power to add or update admin users and their roles.
[en] Track and access admin licenses: You can monitor the usage of your admin licenses to ensure they are being used effectively. This allows for optimized allocation and usage tracking.
[en] Read [en] Understanding your entitlement usage to learn more.
[en] Add and edit admins and their roles: You have the authority to not only add new administrative users but also modify existing ones. This includes assigning roles based on the desired access level and responsibilities, ensuring that the right people have the right access.
[en] View usage history: You can access a complete record of all current and previous usage activities for all admin users within your tenant's model. This historical data is crucial for auditing and compliance purposes, providing insights into administrative activities over time.
[en] Read 管理ユーザー履歴の監視 and テナントログ to learn more.
[en] Understanding your entitlement usage
[en] The Entitlement usage section of the Admin users page provides a comprehensive overview of your admin users, segmented into three categories: Assigned admins, Varicent admins, and Unassigned admins. This segmentation helps you understand how each category affects your usage limits and licensing.
[en] To view your usage:
[en] From the admin panel, click the model drop-down.
[en] Click Tenant settings.
[en] Click the Admin users tab.
[en] From the Overview tab, view your usage metrics categorized by types of admin users:
[en] Types of admin users | [en] Description |
|---|---|
割り当てられている管理者 | [en] Administrators assigned to at least one of your models in the Varicent IncentivesVaricent Incentives admin client. [en] Types of assigned administrators:
|
[en] Varicent administrators | [en] Varicent users who have access to your models for support and implementation purposes. These users don’t count towards your usage limits. The email addresses with the domains @varicent.com or @ibm.com are considered Varicent users. |
[en] Unassigned administrators | [en] Administrators not assigned to any models in the Varicent IncentivesVaricent Incentives admin client. |
[en] Implementation phases
[en] Implementation refers to the period during which a customer is integrating or setting up the Varicent platform. This phase involves specific activities and close collaboration among the customer, partner, and Varicent to ensure the successful deployment of the solution. Below is an explanation of the key elements of this process:
[en] During implementation: During this period, partners (identified by a partner tag in Salesforce) are actively engaged to support the customer. Their email addresses are tracked separately as part of the implementation process, indicating that they have a temporary or special role in assisting with the deployment.
[en] Status tracking: The implementation status for each customer is monitored and updated in Salesforce, specifically in the Status field. This provides a systematic way to determine and report whether a customer is still undergoing implementation activities or has transitioned out of this phase.
[en] After implementation: Once the implementation is complete, all users, including partners, will be counted as Assigned admins.
管理ユーザーの管理
で Varicent Incentives、管理ユーザーの ID、メールアドレス、パスワードを追加、編集、または削除できます。
ユーザーをロールに割り当てることで、ユーザーはテナントに追加され、モデルに関連付けられます。ユーザーに割り当てられた各ロールは、ユーザーに適切なアクセス権を付与します。モジュールへのアクセスに十分な権限のないユーザーは、アクセスを拒否されます。詳細については、ユーザーと権限タブにアクセスしてください。
[en] From the admin panel, click the model drop-down.
[en] Click Tenant settings.
[en] Click the Admin users tab.
[en] From the Overview tab, in the Manage admins table, you can view, filter, and manage your admin users.
注記
[en]If you see a difference between the number of fields in the table and the total number of admins in the usage cards, it could be because you are only viewing the assigned admins for the models you have access to. If you're not assigned to every model within the tenant, security and authorization constraints might prevent you from seeing all the assigned admins.
[en] From the admin table, you can:
[en] Filter admins: Click on the admin cards to filter users. You can use the table’s comprehensive filters to pinpoint specific users. For example, you may want to view only "Licensed" admins or users tied to certain models. This allows precision in managing roles and making sure your admin users are properly assigned where they’re needed.
[en] Add admin: This enables you to configure and assign new admin users to specific models, designate their user roles, and set up their security and authentication constraints.
[en] To learn more about creating a new admin user, read: ユーザーの追加.
[en] Track admins: You can oversee all administrative roles and their details. The table provides key information on each admin, including fields such as:
[en] Type: Indicates whether the user is a Licensed, Partner, or Varicent admin.
[en] Name: The full name of the admin user.
[en] Username: The unique username used by the admin for access.
[en] Email: The admin user's email address.
[en] Models and user roles: Shows the specific models the user can access and the roles they hold within those models. The system marks any models the user isn't assigned to as restricted models and hides their names unless the user shares access.
注記
[en] A restricted model is one that a user cannot access because they are not assigned to it. When users are assigned to different models within the same tenant, they cannot see the names of models assigned to others; those models are labeled as Restricted model(s) instead.
[en] Last activity: Records the most recent action performed by the user, providing insight into how actively each admin is involved in using the system.
[en] Tenant permissions: Specific access levels are granted to users, determining what actions they can perform within the models.
[en] To learn about each user permission in detail, read: [en] Tenant permissions.
[en] Permission
[en] Description
[en] All tenant permissions
[en] The All tenant permissions level grants full administrative control over user management within the system. Administrators with this permission, can add new users, assign and unassign roles, delete users, modify existing permissions, change passwords, lock or unlock user accounts, and view permission settings and roles within the admin table in the Overview tab. Generated use roles does not include the abilities to assign or unassign users, nor to view permissions and roles in the admin table.
[en] This is the highest level of access, allowing complete oversight and control of all user-related functions.
[en] Access permissions only
[en] The Access permissions only level allow limited user management depending on the role type. Administrators can add users, assign and unassign roles, delete users, and lock or unlock users - provided the target user doesn't hold all tenant permissions - but cannot modify permissions or change passwords. Generated user roles can only add users and lock or unlock users under the same condition, with all other actions restricted.
[en] This permission tier is suited for users who need basic user management capabilities within a restricted operational scope.
[en] View permissions only
[en] The View permissions only level restricts users from performing any actions related to user management. These users, regardless of whether they are administrators or hold a generated user role - cannot add, delete, modify, or manage users in any way.
[en] This permission level is intended purely for observation and oversight without any ability to make changes.
[en] SAML 2.0 native login: Indicates whether the admin is using SAML 2.0 for Single Sign-On (SSO). This enables users to authenticate with their existing organizational credentials and eliminates the need to remember an additional password.
[en] SAML 2.0 integration name ID: Represents the unique identifier used by the SAML 2.0 integration to recognize the user, ensuring the correct identity is associated with SAML login sessions and providing added security and consistency across systems.
[en] Tenant permissions
[en] Tenant permissions define the specific actions that an admin user within a particular user role is authorized to perform. Tenant permissions enable critical tasks such as adding and deleting users, changing passwords, and modifying user settings.
[en] Dependency between user roles and tenant permissions
[en] User roles are a way to group users according to the tasks and functions they need to perform. These roles are created with specific capabilities in mind, allowing users to access certain parts of the module that align with their responsibilities.
[en] You can define and adjust these roles in the Roles permissions page in Model settings. Here, you can decide what actions each role can perform, such as whether they can edit, view, or delete Presenter Adaptive reports, or modify calculations.
[en] To learn more, read: ロール.
[en] Tenant permissions define what specific actions a user within a role can perform. They are granular controls within a role that dictate the extent of authority a user has. For instance, permissions might include adding or removing other users, changing passwords, or accessing roles.
[en] While roles provide a general framework of access levels, permissions enable users to perform specific actions associated with those roles.
[en] When creating a new admin user, it is important to assign specific user permissions that match their roles and responsibilities. Additionally, permissions for existing admins can be edited as necessary. There are three types of user permissions, each detailing the tasks that an admin can perform:
[en] Tenant Permission | [en] Add user | [en] Assign roles | [en] Unassign users | [en] Delete user | [en] Modify permissions | [en] Change passwords | [en] Lock/unlock user | [en] View permission & roles in the list of admin users table |
|---|---|---|---|---|---|---|---|---|
[en] All tenant permissions [en] User role: Administrator | ✓ | ✓ | ✓ | ✓ | ✓ | ✓ | [en] ✓ | ✓ |
[en] All tenant permissions [en] User role: Any generated user role | ✓ | X | X | ✓ | ✓ | ✓ | [en] ✓ | X |
[en] Access permissions only [en] User role: Administrator | ✓ | ✓ | ✓ | ✓ | X | X | [en] ✓¹ | ✓ |
[en] Access permissions only [en] User role: Any generated user role | ✓ | X | X | X | X | X | [en] ✓¹ | X |
[en] View permissions only [en] User role: Administrator | X | X | X | X | X | X | X | ✓ |
[en] View permissions only [en] User role: Any generated user role | X | X | X | X | X | X | X | X |
[en] ¹ Lock/unlock is allowed only if the logged-in user does not have All tenant permissions and the user being edited does not have All tenant permissions.
[en] The table below clarifies how different permissions affect what users can see, based on their assigned roles:
注記
[en] Make sure all necessary Entitlements permissions are enabled for any user generated role.
[en] Read 権利権限の有効化 to learn more.
[en] Tenant permission | [en] User role | [en] Access level |
|---|---|---|
[en] All tenant permissions | [en] Administrator | [en] They can see both tenant permissions and user roles for the model to which they are assigned. |
[en] Access permissions only | [en] They can see both tenant permissions and user roles for the model to which they are assigned. | |
[en] View permissions only | [en] They can see both tenant permissions and user roles for the model to which they are assigned. | |
[en] All tenant permissions | [en] Any generated user role | [en] They have access to view the permissions of all users within a particular tenant, regardless of any model. They can also view tenant permissions of users who have restricted model access. |
[en] Access permissions only | [en] They have access to view the permissions of all users within a particular tenant, regardless of any model. They can also view tenant permissions of users who have restricted model access. | |
[en] View permissions only | [en] They have access to view the permissions of all users within a particular tenant, regardless of any model. They can also view tenant permissions of users who have restricted model access. |
ユーザーの追加
[en] You can add new users to your tenant from the Admin users page in Tenant settings. This involves defining their roles, setting permissions, and ensuring they have the necessary access to perform their tasks effectively. Here's how you can get started:
[en] From the admin panel, click the model options drop-down.
[en] Click Tenant settings.
[en] Click the Admin users tab.
クリック 環境設定 → 管理ユーザー。
[en] Enter the admin's Username, First name, Last name, and Email.
注記
[en] The admin's username must be unique across the entire data center, not just within a single tenant.
[en] Under SAML 2.0 integration, turn the Use native login when SAML2.0 integration is enabled toggle on to enable native login even when SAML2.0 integration is active.
[en] It's an alternative login method that can be useful if there are issues with the SAML 2.0 system or if some users need to log in using a different method for any reason.
ユーザーに必要な情報をすべて入力します。
ヒント
SAML 2.0統合の詳細については、「インスタレーションと設定ガイド」を参照してください。
[en] Under Password, create a password that is at least 8 characters long and includes a lowercase letter, an uppercase letter, a number, and a symbol.
注記
[en] Passwords should not match the Username. Passwords will automatically expire every 90 days. The system remembers the last 13 passwords you used, so you cannot reuse them. If you attempt to log in and enter the wrong password five times, your account will be temporarily locked.
次のいずれかのユーザー権限を選択できます。
注記
これらはテナントに対する権限であり、特定のモデルに対する権限ではありません。
[en] To learn about each tenant permission in detail, read: [en] Tenant permissions.
許可
説明
すべての権限
これにより、ユーザーは、ユーザーの追加と削除、モデルへのユーザーの割り当てと削除、および、他のユーザーのパスワードの変更を行うことができます。
[en] This is the highest level of access, allowing complete oversight and control of all user-related functions.
モデル内のユーザーの追加と削除
[en] The Access permissions only level allow limited user management depending on the role type. Administrators can add users, assign and unassign roles, delete users, and lock or unlock users - provided the target user doesn't hold all tenant permissions - but cannot modify permissions or change passwords. Generated user roles can only add users and lock or unlock users under the same condition, with all other actions restricted.
[en] This permission tier is suited for users who need basic user management capabilities within a restricted operational scope.
許可がありません
[en] The View permissions only level restricts users from performing any actions related to user management. These users, regardless of whether they are administrators or hold a generated user role - cannot add, delete, modify, or manage users in any way.
[en] This permission level is intended purely for observation and oversight without any ability to make changes.
[en] Under Model assignment, click Assign admin to model, and select one or more models to add the new admin user to.
注記
[en] If you don't assign the admin to any model, they won’t be able to log in to Varicent IncentivesVaricent Incentives.
ユーザーを追加するモデルを選択した場合は、[ユーザー・ロール]ドロップダウン・リストから、ユーザーのロールを選択します。
[en] You can define and adjust these roles in the Roles permissions page in Model settings. Here, you can decide what actions each role can perform, such as deciding if they can edit, view, or delete Presenter AdaptivePresenter Adaptive reports, or modify calculations in the Composer module. When you create a new role in the Roles permissions page, it becomes available in the User role dropdown for easy assignment.
[完了]をクリックします。
[en] The add admin feature changes depending on the logged-in user’s role and their tenant permissions:
[en] Only users with All tenant permissions or Access permissions only can add new users.
[en] To assign users to specific models, the user must have the Administrator role.
[en] Users with Access permissions only (whether admin or custom roles) can add new users, who will automatically get the same permission level.
[en] Users with View permissions only (admin or custom roles) won’t see the Add admin button and cannot add new users to the tenant.
ユーザーのパスワードの変更
Incentivesでユーザーのパスワードを変更できます。
[en] From the admin panel, click the model options drop-down.
[en] Click Tenant settings.
[en] Click the Admin users tab.
パスワードを変更するユーザーの行で、コンテキストメニュー(...)をクリックします。
ユーザーパスワードの[変更]を選択します。
新しいパスワードを入力して確認します。
注記
管理者Webアプリケーション・ユーザーのパスワードを作成する際は、次の規則が適用されます。
パスワードは、8文字以上でなければなりません。
パスワードには、少なくとも大文字1文字、小文字1文字、数字1文字、特殊文字1文字を含めなければなりません。
パスワードをユーザーIDと同じにすることはできません。
パスワードは、90日で期限切れになります。
パスワードの履歴制限は、13回です。
ユーザーが管理者Webアプリケーションからロック・アウトされるまでの失敗の試行回数は、5回です。
これらのルールは、エンド・ユーザーが変更することはできません。
[保存]をクリックします。
管理ユーザーの編集
名、姓、電子メール、SAML2.0統合名ID、ユーザー権限の変更など、管理ユーザーの既存の詳細を編集できます。
管理パネルで、モデルドロップダウンをクリックします。
[en] Click Tenant settings.
[en] Click the Admin users tab.
[en] From the Overview tab, go to the Manage admins table and click the More options menu (...) next to the admin user that you want to edit.
[ユーザーの編集]をクリックします。
[en] Edit the admin's First name, Last name, and Email as required.
注記
[en] Users with All tenant permissions can edit any user’s first name, last name, or email address without restrictions.
[en] Users with Access permissions only can edit another user’s first and last name only if that user does not have All tenant permissions. This applies regardless of model assignments or whether the user has the Administrator role.
[en] Edit the admin's SAML 2.0 integration details as required.
注記
[en] You can edit a user’s SAML2.0 Integration if you have All tenant permissions, or if you have Access permissions only, and the user you're editing has lower permissions.
[en] Edit the admin's password as required.
注記
[en] You can edit an admin's password only if the logged-in user has All tenant permissions.
ドロップダウンメニューから、ユーザーの既存の詳細を上書きしたり、ユーザー権限を変更したりできます。
注記
[en] You cannot modify your own user settings unless you have All tenant permissions. If you switch to a different user permission, you won't be able to change it back yourself. This setting is fixed.
[en] To learn more about permissions, read: [en] Tenant permissions.
[en] Turn the Lock admin toggle on to lock the admin user.
[en] Read ユーザーのロック to learn more about locking users.
[en] Under Model assignment, click Assign admin to model, and select one or more models to which you want to add the existing admin user.
注記
[en] A user with All tenant permissions and Access permissions only can assign or unassign other users only to the models where they also hold the Administrator role.
[en] For example, if they're assigned to Model A and Model B but are an admin only in Model A, they can assign or unassign users only in Model A.
[en] Tenant permission
[en] User role in a model
[en] Can assign or unassign users to models?
[en] All tenant permissions
[en] Administrator
[en] Yes
[en] All tenant permissions
[en] Any generated user role
[en] No
[en] Access permissions only
[en] Administrator
[en] Yes
[en] Access permissions only
[en] Any generated user role
[en] No
[en] View permissions only
[en] Administrator
[en] No
[en] View permissions only
[en] Any generated user role
[en] No
[en] Under Model assignment, click the
 icon next to the model name to unassign the user from the selected model.
注記
[en] By unassigning a user, you revoke the user's role as an administrator within that specific model. However, the user still remains part of the tenant.
[en] To learn more, read 管理ユーザーの削除.
[en] Click the Select user role dropdown of the required model, and edit the role that defines this user's access and actions within the selected model.
注記
[en] If the user is assigned to more than one model, check roles against models individually to edit appropriate access.
[en] For example, if John is linked to Model X and Model Y, and he is assigned an admin role in Model X for full access but only has a custom Role A in Model Y for limited actions, make sure these roles are set correctly for each.
[en] You can define and adjust these roles in the Roles permissions page in Model settings. Here, you can decide what actions each role can perform, such as if the user can edit, view, or delete Presenter AdaptivePresenter Adaptive reports, or modify calculations in the Composer module. When you create a new role in the Roles permissions page, it becomes available in the Select user role dropdown for easy assignment.
[保存]をクリックします。
管理ユーザーの削除
すべてのモデルから管理ユーザーを完全に削除するには:
注記
モデルに割り当てられていないユーザーは、管理ユーザーの権限制限にカウントされません。
[en] Difference between unassigning vs deleting a user
[en] Unassigning an administrative user removes their association with a specific model within a tenant. This action revokes the user's role as an administrator for the selected model. However, the user remains part of the tenant and retains associations with any other models they are assigned to.
[en] For example, you have an admin user who manages models A and B within a tenant. If their responsibilities change and they no longer need administrative access to Model A, they can be unassigned from Model A. Removing the user from Model A ensures they can't make changes or access administrative functionalities within Model A, but they can continue to manage Model B within the tenant.
[en] Deleting an administrative user entirely removes them from the tenant and all associated models. This action is irreversible and means the user will no longer have any access or roles within the tenant. You can typically use deletion when a user leaves the organization or their role become obsolete.
[en] To learn more, read: [en] Deleting an admin user.
[en] To unassign an admin user:
[環境設定]をクリックします。
[en] Click Tenant settings.
[en] Click the Admin users tab.
[en] From the Overview tab, go to the Manage admins table and click the More options menu (...) next to the admin user that you want to unassign.
[ユーザーの削除]をクリックします。
[en] Under Model assignment, click the
icon next to the model name to unassign the user from the selected model.確認ウィンドウで、 [ユーザーの削除]をクリックします。
ユーザーのロック
[en] Locking a user is a preventative measure that temporarily restricts a user from logging into Varicent IncentivesVaricent Incentives . This feature is particularly useful in scenarios where you suspect unauthorized access or as a response to security breaches. Only users with designated user permissions have the authority to execute this action. Once a user is locked, they remain unable to access their account until an admin unlocks them.
注記
[en] An admin can lock or unlock another user if they have All tenant permissions, or if they have Access permissions only and the user they’re trying to edit does not have All tenant permissions. In other words, users with Access permissions only can only lock or unlock others with access or view permissions.
[en] To learn more, read: [en] Tenant permissions.
ホームページで、モデル名をクリックします。
[en] Click Tenant Settings.
[en] Click the Admin users tab.
クリック 環境設定 → 管理ユーザー。
[en] From the Manage admins table, click the More options menu (...) of the admin user that you want to lock.
[en] Or
[en] From the Manage admins table, click the More options menu (...) of the admin user, and click Edit admin.
[ユーザーをロック]をクリックします。
確認ウィンドウで、 [ユーザーをロック]をクリックします。
ユーザー名の横にロックアイコンが表示されます。 管理ユーザー テーブル。
[en] To unlock a user, read ユーザーのロック解除.
ユーザーのロック解除
[en] Unlocking a user restores their access to Varicent Varicent IncentivesVaricent Incentives . If a user gets locked out, it could be due to multiple failed login attempts with incorrect passwords or because an admin has manually locked their account. By unlocking a user, you grant them the ability to log in once again. To learn about how to lock a user, read: ユーザーのロック.
注記
ユーザーのロックを解除するには、 管理者オプション 表示と編集の権限が有効になっています。ユーザー権限設定には以下からアクセスできます。 モデル設定 → ユーザーと権限。 見る アクセス権限 詳細についてはこちらをご覧ください。
[en] Read [en] Tenant permissions to learn more.
から 管理パネル、モデルのドロップダウンをクリックします。
[en] Click Tenant settings.
クリック 環境設定 → 管理ユーザー。
[en] From the Overview tab, go to the Manage admins table and click the More options menu (...) next to the admin user that you want to unlock.
クリック ユーザーのロック解除。
確認ウィンドウで、 ユーザーのロック解除。
[en] Deleting an admin user
[en] Deleting an administrative user entirely removes them from the tenant and all associated models. This action permanently removes the user's access and roles within the tenant. This feature is particularly useful in scenarios where a user leaves the organization or their role becomes obsolete.
[en] For example, you have an admin user who is no longer part of the organization. To ensure you are up to date on security and compliance, delete their account, removing their ability to access any models or perform any administrative functions within the tenant. This ensures that no unauthorized access can occur from that user's account.
[en] The ability to delete other admin users is restricted for certain user roles and tenant permissions. The table below details these limitations for each tenant permission:
注記
[en] A restricted model is one that a user cannot access because they are not assigned to it. When users are assigned to different models within the same tenant, they cannot see the names of models assigned to others; those models are labeled as Restricted model(s) instead.
[en] Tenant permission | [en] User role | [en] Target user type | [en] Can delete user? |
|---|---|---|---|
[en] All tenant permissions | [en] Any generated user role | [en] No model assigned | [en] Yes |
[en] All tenant permissions | [en] Any generated user role | [en] Same model | [en] No |
[en] All tenant permissions | [en] Any generated user role | [en] Restricted model(s) | [en] No |
[en] All tenant permissions | [en] Admin | [en] Any | [en] Yes |
[en] Access permissions only | [en] Admin | [en] No model assigned | [en] Yes |
[en] Access permissions only | [en] Admin | [en] Same model | [en] Yes |
[en] Access permissions only | [en] Admin | [en] Restricted model(s) | [en] No |
[en] Access permissions only | [en] Admin | [en] No model assigned | [en] Yes |
[en] Access permissions only | [en] Any generated user role | [en] Same model | [en] No |
[en] Access permissions only | [en] Any generated user role | [en] Restricted model(s) | [en] No |
[en] View permissions only | [en] Admin | [en] Any | [en] No |
[en] View permissions only | [en] Any generated user role | [en] Any | [en] No |
[en] To delete an admin user:
[en] From the admin panel, click the model options drop-down.
[en] Click Tenant settings.
[en] Click the Admin users tab.
[en] From the Overview tab, go to the Manage admins table and click the More options menu (...) next to the admin user that you want to unlock.
[en] Click Delete admin.
[en] Click Delete from the confirmation dialog box to permanently delete the admin user from all their associated models.
管理ユーザー履歴の監視
以下の手順に従って、環境内のすべての集計モデルにおける、受け取り人の過去の使用状況にアクセスできます。
[en] To keep an eye on how admin users have been doing over time, you can get a summary of their past activity by following a few easy steps:
管理パネルで、モデルドロップダウンをクリックします。
[en] Click Tenant settings.
[en] Click the Admin users tab.
[en] Click the Overview tab.
[en] On the Overview tab, you'll find the Assigned administrator history graph, which provides a clear, monthly overview of the number of administrative users assigned to various models in the Varicent IncentivesVaricent Incentives admin client. These users are responsible for managing at least one of the models within the same admin client.
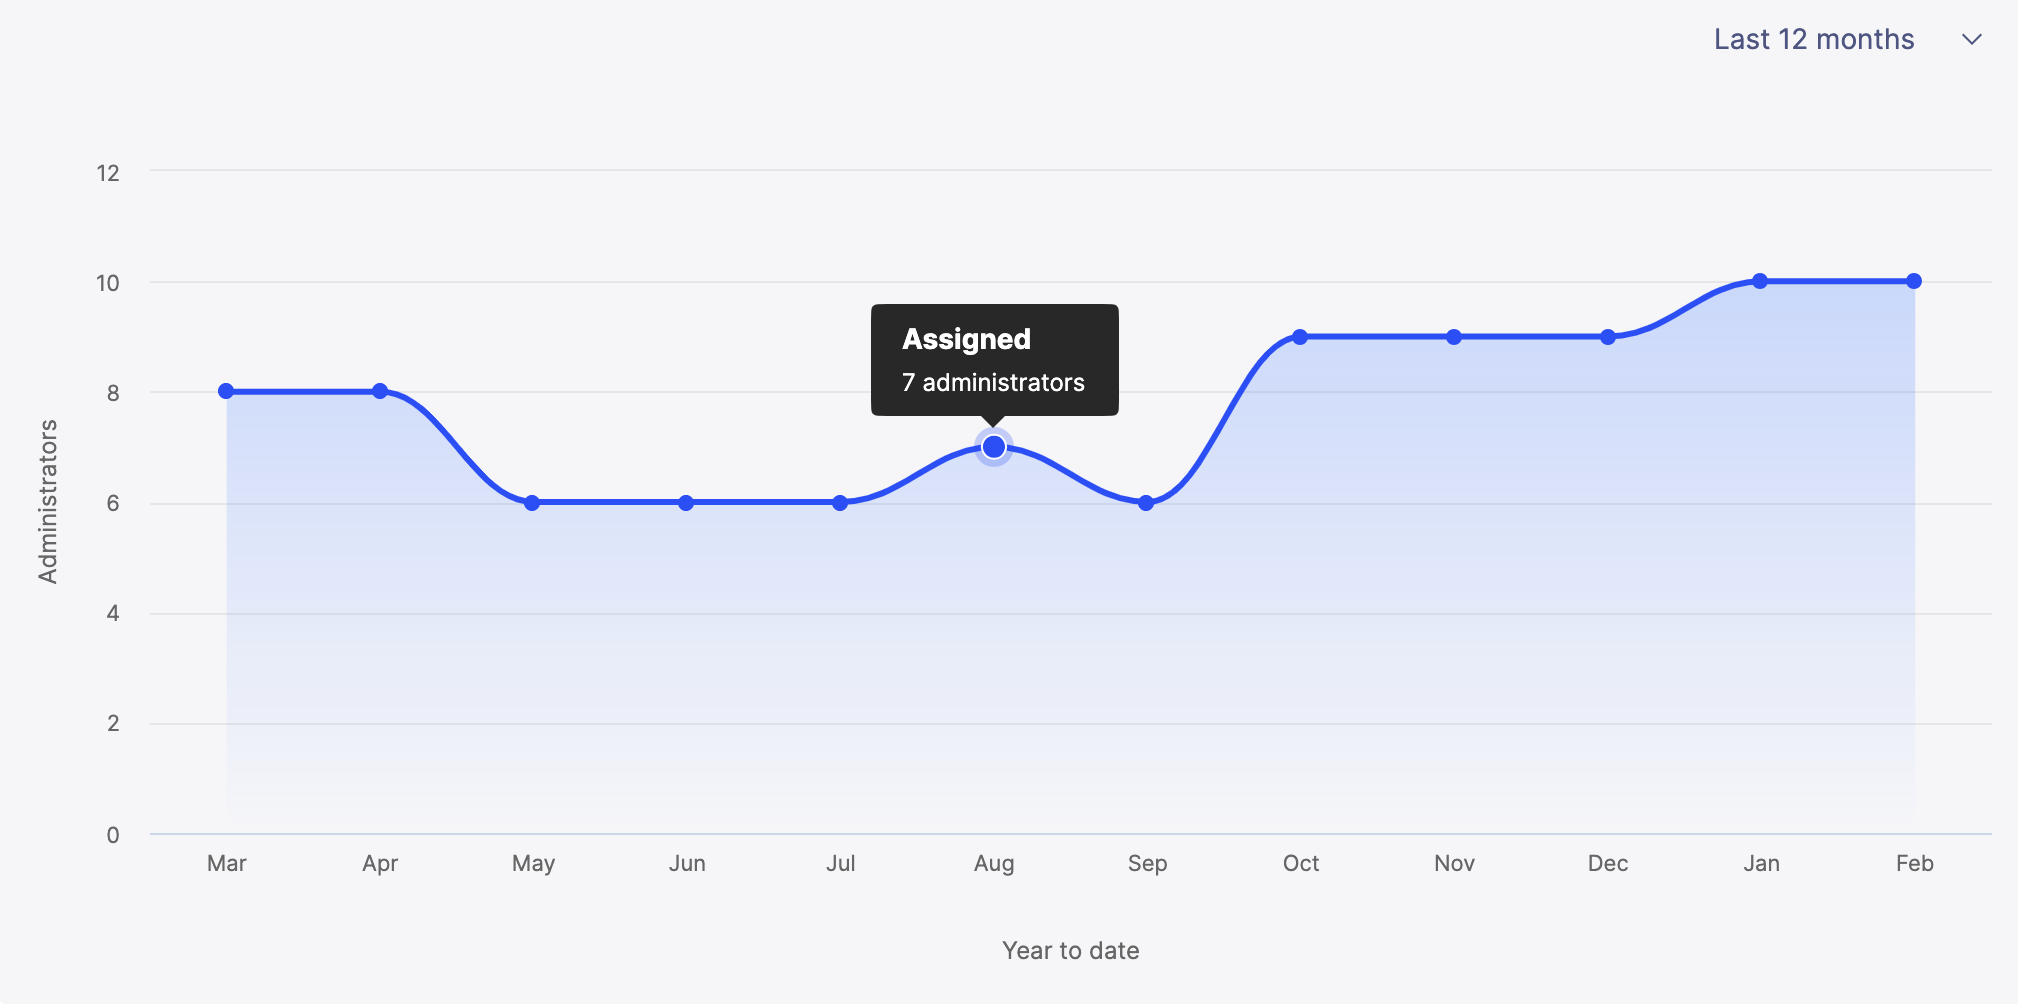
ドロップダウンオプションから、過去の管理の年間使用状況を表示することもできます。
ドロップダウンオプションから、過去の管理の年間使用状況を表示することもできます。
テナントログ
[en] Use the Activity tab on the Admin users page to closely monitor the actions of administrative users within your system. This Activity tab provides insights into user events such as logins and logouts, allowing you to view the activity log, apply filters to the displayed events, and export the data to a .CSV file for offline analysis.
注記
代わりに、管理ユーザーのアクティビティを[監査ページ]にプッシュすることもできます。この動作を有効にするには、サポートにお問い合わせください。
有効にすると、[管理ユーザー]ページの[アクティビティ]タブは表示されません。
テナントログを表示するには、次の手順を実行します。
[en] From the admin panel, click the model options drop-down.
[en] Click Tenant settings.
[en] Click the Admin users tab.
[en] Click the Activity tab.
これらのイベントはテナントログで表示できます。
[en] Date/Time: Displays the exact date and time of each recorded event.
[en] Username: Indicates the user who performed the action.
[en] Event: Describes the specific activity or action taken by the user.
[en] Success: Signifies whether the event was successfully completed.
[en] Error: Details any errors encountered during the event.
これらのイベントはテナントログで表示できます。
ユーザーログイン
SSOユーザーログイン
ユーザーログアウト
SSOユーザーのログアウト
ユーザー{email}がパスワードを変更しました。
ユーザー{email}がパスワードをリセットします。
ユーザー{email}がパスワードのリセットをリクエストしました。
ユーザー{email}が{models}に追加されました。
ユーザー{email}が{models}から削除されました。
ユーザー{email}が{models}から削除されました。
ユーザー{email}が作成されました。
ユーザー{email}が{models}で作成されました。
[en] License usage acknowledgment: Records when a user acknowledges that their admin license, payee license, or import record usage has reached 85%, 95%, or exceeded its limit.
[en] To download a copy of the activity log, read: 管理者ユーザーのアクティビティのエクスポート.
管理者ユーザーのアクティビティのエクスポート
[en] Exporting the admin users' activity log is a convenient way to archive or analyze this data offline. By downloading the log as a .CSV file, you can capture a detailed account of all admin users' activities. The flexibility of the activity log gives you an opportunity to review and manage user interactions over time.
すべての管理ユーザーアクティビティログをエクスポートするには:
[en] From the admin panel, click the model options drop-down.
[en] Click Tenant Settings.
[en] Click the Admin users tab.
[en] Click the Activity tab.
必要に応じて、日付範囲を指定して、指定した期間のユーザー アクティビティのみをダウンロードします。
[エクスポート]をクリックします。
CSV ファイルはローカルにダウンロードされます。
[en] Managing disconnected admins
[en] Disconnected admins are admin users that exist in a model but not in the tenant. They do not count towards your usage limit.
[en] The system removes any users you identify as Disconnected from the admin user list and relocates them to a different section. For example, if you moved from an on-premise setup to the cloud, some admins might not have transferred correctly and become disconnected. You can delete them or contact the support team to reactivate them.
[en] View disconnected admins:
[en] From the admin panel, click the model drop-down.
[en] Click Tenant Settings.
[en] Click the Admin users tab.
[en] Click the Disconnected admins tab.
[en] Delete disconnected admins:
[en] If you delete an admin who manages user accounts, that admin permanently loses access to all related tasks and cannot be recovered.
注記
[en] Once an admin is deleted, they cannot be restored.
[en] From the admin panel, click the model drop-down.
[en] Click Tenant Settings.
[en] Click the Admin users tab.
[en] Click the Disconnected admins tab.
[en] Click the More options menu (...) of the disconnected admin user you want to delete.
[en] Click Delete admin.
[en] Restore disconnected admins:
[en] From the admin panel, click the model drop-down.
[en] Click Tenant Settings.
[en] Click the Admin users tab.
[en] Click the Disconnected admins tab.
[en] Click Contact Support.
[en] Fill out the required information in the form and submit your case. Our support team will respond to help resolve your issue.
受け取り人ユーザーの追跡
受け取り人ユーザータブでは、環境とそのモデルの受け取り人ユーザー数を追跡できます。環境の現在のモデルに登録されているすべての受け取り人ユーザーについて、現在と過去の使用状況がすべて表示されます。
注記
初めて受け取り人ユーザー画面にログインすると、すべての受け取り人に標準とアクティブのフラグが付けられます。受け取り人データのマッピングを開始して、すべての受け取り人情報を正確に追跡および表示します。
注記
環境には、すべてのモデルの権利の合計使用数のみが表示されます。モデルごとに使用状況を追跡することはできません。
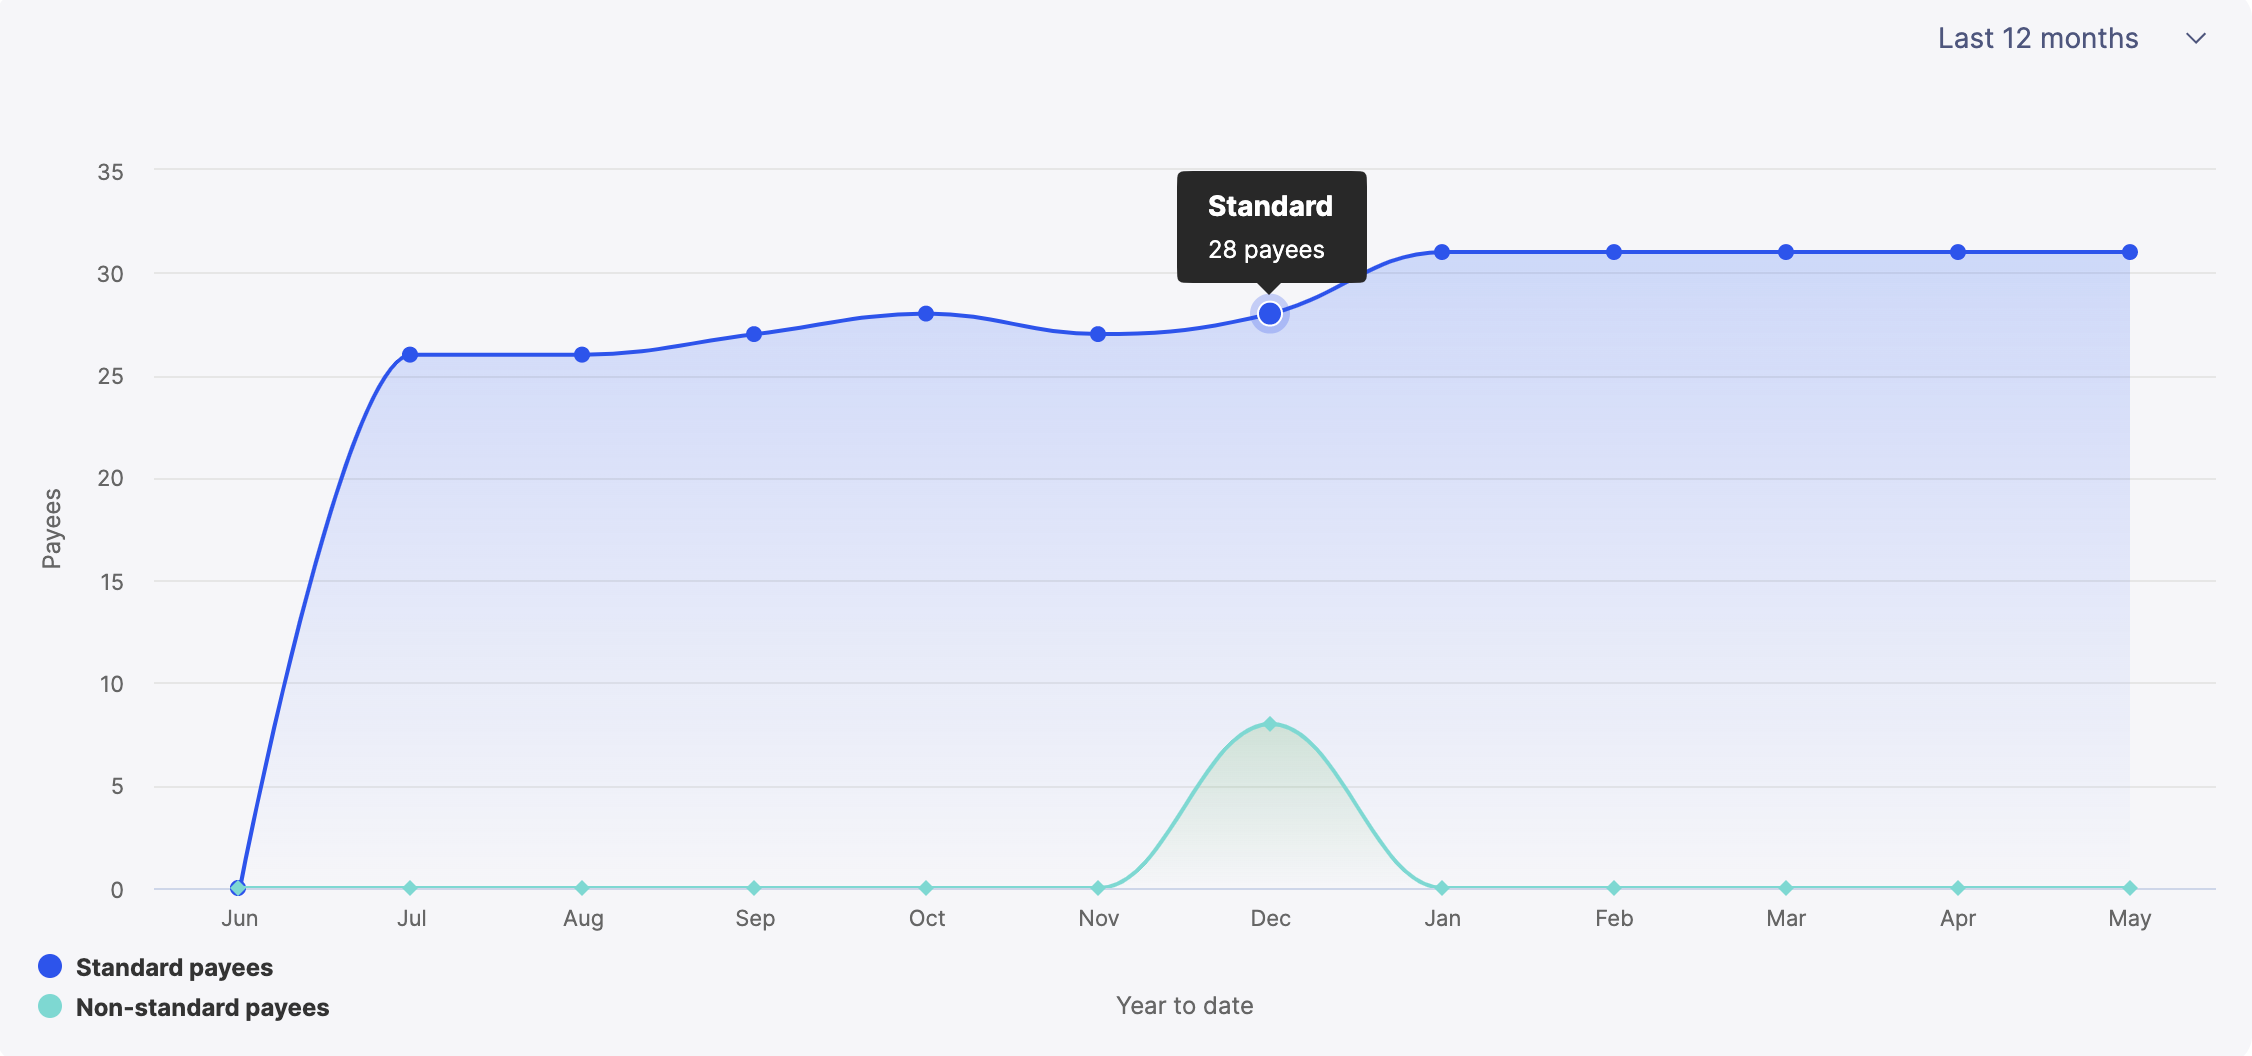
[en] Payee types
[en] You can select whether the payee is categorized as ‘Standard’ or ‘Non-standard’ in the System Effective Dated Payee table in IncentivesIncentives:
[en] Standard payees
[en] Standard payees are individuals who regularly participate in one or more compensation programs. They are:
[en] Managed or tracked using Varicent IncentivesVaricent Incentives.
[en] Participate consistently in compensation programs.
[en] Counted as Standard in the System Effective Dated Payee table within Varicent IncentivesVaricent Incentives.
[en] Considered Active if they are included in Varicent IncentivesVaricent Incentives tables with calculation capabilities.
[en] Example: A salesperson who regularly receives commission-based pay for meeting sales targets.
[en] Non-standard payees
[en] Non-standard payees participate in compensation programs less frequently or in a specialized manner. They are:
[en] Managed with special Varicent IncentivesVaricent Incentives calculations, often not continuous.
[en] Participate as payees who may operate based on fixed timelines, specific management objectives, or irregular participation.
[en] Counted as Non-standard in the System Effective Dated Payee table within Varicent IncentivesVaricent Incentives.
[en] Considered Active if listed in Varicent IncentivesVaricent Incentives tables for non-standard purposes.
[en] A non-transactional payee who participates in compensation programs not driven by standard transactions.
[en] Example: A consultant who might earn a performance bonus based on achieving specific project milestones.
[en] Payee status
[en] You can select whether the payee’s status in this environment is set to ‘Active’ or ‘Inactive’ in the System Effective Dated Payee table in IncentivesIncentives. The status of a payee determines their eligibility and participation level:
[en] Active payees: Employees or participants currently involved in programs, tracked for performance-based compensation.
[en] Inactive payees: Individuals not currently part of any compensation programs, typically former employees or temporarily inactive members. These payees do not count towards your total Standard and Non-standard payee count.
注記
[en] Inactive payee limits apply only if the customer has purchased specific subscriptions for managing inactive users.
[en] License and usage scenarios
[en] Licensing, in this context, refers to the number of payees - both Standard and Non-standard - that you are allowed to manage across different scenarios within the system. Below is a simplified overview:
[en] Scenario | [en] Type | [en] Status | [en] License requirement |
|---|---|---|---|
[en] Standard and Active | [en] Standard | [en] Active | [en] License is required; limited by license count. |
[en] Non-standard and Active | [en] Non-standard | [en] Active | [en] License is required; limited by license count. |
[en] Inactive (Special cases) | [en] Any | [en] Inactive | [en] No limit unless you purchase an Inactive Payee license. |
[en] Example:
[en] Imagine a company using Varicent IncentivesVaricent Incentives to manage payees. They have:
[en] 200 Standard Active payees: Regular employees actively participating.
[en] 50 Non-standard Active payees: Employees part of special bonus programs.
[en] 30 Inactive payees: Not currently in employment, and they decide whether to track them by purchasing an additional license.
[en] The company must ensure its license includes all Standard Active and Non-standard Active payees. Tracking Inactive payees may require an additional license.
受け取り人ユーザーの履歴の監視
以下の手順に従って、環境内のすべての集計モデルにおける、受け取り人の過去の使用状況にアクセスできます。
管理パネルから、モデルドロップダウンをクリックします。
[環境設定]をクリックします。
受け取り人ユーザータブで、[履歴]をクリックします。
受け取り人データのマッピング
Incentivesでは、受取人情報データを正確かつ透過的に追跡できるように、すべての有効期間内の受取人情報を管理するためのPayeeEffectiveDatedInfo_システムテーブルを導入しました。
受け取り人データのマッピングツールを使用すると、モデルの有効期間内受取人情報を含む既存のカスタムテーブルをPayeeEffectiveDatedInfo_システムテーブルにマッピングしてプレビューできます。
これらのテーブルをマッピングすると、これらのテーブルを結合するSQLクエリを書き込む時間を節約できます。マッピングされたデータのインポートをスケジュールすると、受け取り人データは常に更新されるため、テーブルを更新するたびに新しいクエリを実行する必要はありません。
注記
正確なデータで受け取り人ユーザータブを有効にするには、受け取り人データのマッピングが必要です。
データのマッピング権限の有効化
モデル設定で権利が有効になっている場合にのみ、受け取り人データをマッピングできます
管理パネルから、[モデルの設定]
をクリックします。[ユーザーおよび権限] -> [ロールの権限]を選択します。
権利で[受取人データをマッピング]チェックボックスを有効にします。
受け取り人の使用状況データのマッピング
カスタムテーブルをPayeeEffectiveDatedInfo_システムテーブルに接続し、権利の使用状況ツールで受け取り人の使用状況機能を有効にします。
[管理]パネルで、モデルオプションドロップダウンをクリックし、[環境設定]を選択します。
[受け取り人ユーザー]ページから、[受け取り人データのマッピング]タブを選択します。
PayeeEffectiveDatedInfo_テーブルにインポートするソーステーブルを選択します。
[一致フィールド]をクリックします。
ターゲットのPayeeEffectiveDatedInfo_テーブルに一致させるソースファイルのフィールドを選択します。
受け取り人ID
受け取り人IDを指定する列を選択します。
受け取り人タイプ
PayeeEffectiveDatedInfo_テーブルで、受け取り人を標準または非標準のどちらに分類するかを指定する列を選択します。
受け取り人ステータス
PayeeEffectiveDatedInfo_システムテーブルで、受け取り人をアクティブまたは非アクティブのどちらに分類するかを指定する列を選択します。
有効開始
テーブルのEffective_Startの日付として使用する日付列を選択します。
有効終了
テーブルのEffective_Endの日付として使用する日付列を選択します。
[フィールドの変換]をクリックします。
一致する列の値を変換して、受け取り人タイプの値にマップし、[次へ]をクリックします。
受け取り人タイプ列がない場合は、各受け取り人レコードのデフォルト値として標準と非標準のいずれかを選択する必要があります。
受け取り人タイプ列がある場合は、その列の値を標準または非標準に一致させる必要があります。
一致する列の値を変換して、受け取り人ステータスの値にマップします。
受け取り人ステータス列がない場合は、特に指定されない限り、すべてのレコードに自動的にアクティブのフラグがつけられます。
受け取り人ステータス列がある場合は、その列の値をアクティブまたは非アクティブに一致させる必要があります。
[結果の表示]をクリックして、インポートをプレビューし、名前を付けます。
[保存して実行]をクリックし、インポートを実行します。
注記
グローバルアクションが進行中の場合には、インポートの実行を開始できませんが、後で利用するために設定を保存できます。
インポートの進捗状況は、アクティビティモジュールで追跡できます。インポートに成功したら、インポートをスケジューラーモジュールでスケジュールできます。
注記
インポートをスケジュールしない場合、受け取り人データに行われた変更は更新されません。保存したインポートがインポートスケジュールに沿っていることを確認します。
マッピングされたインポートを編集するには:
[管理]パネルで、モデルオプションドロップダウンをクリックし、[環境設定]を選択します。
[受け取り人ユーザー]ページから、[受け取り人データのマッピング]タブを選択します。
[マッピングの管理]をクリックします。
マッピングの手順を繰り返し、必須フィールドを編集します。
インポートレコードの追跡
Varicent Incentivesは、すべての顧客のインポートレコードの使用状況を自動的に追跡し、インポートデータに簡単にアクセスできるようにします。
注記
[en] If you purge data rows and re-import them, the system considers them new and counts them toward your usage limit.
[en] To access the Import records page:
[en] From the admin panel, click the model options drop-down and select Tenant settings.
[en] Click the Import records page.
[en] The Import records page is divided into the following two sections:
[en] Overview tab:
[en] Import usage limit overview
[en] This part provides a concise view of your total data volume usage for the current month. It only accounts for new data rows processed, and any re-imported data rows are considered as new.
[en] New data row imports for the current month
[en] Counted towards monthly usage limit: Displays details of newly imported data rows that count against your current month's data volume limit.
[en] Not counted towards monthly usage limit: Indicates updated rows that do not impact your data volume limit.
[en] Total rows imported: Summarizes the total number of data rows imported within the month.
[en] Usage over time
[en] A bar graph segmented by models offers a visual representation of data volume trends and patterns in data imports over time. Click on a segment on the graph to see more details on the Import records Activity tab.
[en] Activity tab:
[en] This section offers a breakdown of logs and activities associated with your imports.
[en] Read Tracking import usage activity to learn more about this section.
資格に関するよくある質問
このセクションでは、権利機能に関するよくある質問への回答を示します。
方法についてはこの記事をご覧ください 権限を有効にする。
質問
割り当てられた管理者番号はどこから来るのでしょうか?
割り当てられた管理者をカウントするロジックでは、テナント内の 1 つ以上のモデルへのアクセスが許可されているユーザーの数を確認します。
次のメールアドレスは除外されます:
ドメイン: @varicent.com または @ibm.com。
実装期間中のパートナーの電子メール アドレス。
パートナー メールは、Salesforce のパートナー タグによって識別されます。
実装ステータスは、各顧客の Salesforce のステータス フィールドから取得されます。
ロジックの要約
モデルへのアクセス権を持つ残りの管理者は、割り当てられた管理者の使用量に貢献します。
テナントへのアクセス権はあるものの、モデルへのアクセス権が付与されていない管理者は、割り当てられていない管理者の使用に寄与します。
管理者ユーザーページには
テナントへのアクセス権を持ち、どのモデルにも割り当てられていないユーザー。
1 つ以上のモデルに割り当てられたユーザー。
履歴タブでは、集計された権利(管理者/受取人/インポート レコード)が追跡され、毎日更新されます。
インポートレコードはどのように計算しますか?
輸入権限は 1 日に 1 回計算されます。
実稼働モデルへのインポートのみ(非実稼働モデルではない)が権利としてカウントされます。
追加されたレコードのみ(更新されたレコードではない)が権利としてカウントされます。
モデル内インポートは権利の対象にはなりません。
インポートレコードの使用状況画面に何も表示されないのはなぜですか?
これは、プロダクション タグが付けられたモデルへのインポートがまったく行われなかった場合に発生する可能性があります。
システムは挿入と更新をどのように区別しますか?
システムは組み込みの SQL 比較を使用して、各行がテーブル内に既に存在するかどうかを確認します。
行が存在する場合、変更された行としてカウントされます。
行が存在しない場合は、新しい行としてカウントされます。
このプロセスは、エンタイトルメントの行が新規か更新されたかを追跡します。
受取人の使用量はどのように計算されますか?
受取人の使用量は、システムの受取人有効日付情報 (PEDI) テーブルを使用して計算されます。
このテーブルがプロダクション タグ付きモデル内にあることを確認するためのチェックが実行されます。
マッピングが完了すると、ユーザーは受取人の種類とステータスをシステム値にマッピングできるようになります。
標準
非標準
有効: 受取人の使用制限にカウントされます
非アクティブ: 受取人の使用制限にカウントされません
Payee_ テーブルには存在するが PEDI テーブルには存在しない受取人は、標準タイプおよびアクティブ タイプのユーザーとみなされます。
システムは受取人を追跡し、標準、非標準、アクティブ、非アクティブのセクションに反映します。