[en] FunnelCake for Salesforce Classic
[en] FunnelCake for Salesforce brings the power of FunnelCake into Salesforce where your teams are already working. There are a few steps to getting up and running. This guide will go over:
[en] Installing the package.
[en] Setting up health cards for leads, contacts, and opportunities.
[en] Setting up the To-Do List for reps.
[en] Setting up other FunnelCake reports on home pages.
[en] Installing the package
[en] Install the FunnelCake for Salesforce managed package on your Salesforce instance.
[en] Setting your FunnelCake domain name in Salesforce settings
[en] In order for FunnelCake cards and reports to load in your Salesforce, you'll need to setup your FunnelCake domain name.
[en] In the top right corner of Salesforce, click Setup.
[en] Down the left side of your screen you will see a menu with a Quick Find search box. Type "custom settings" into the search box, and then under Develop, select Custom Settings.
[en] On the Custom Settings page, you should see an entry for FunnelCake Instance. Click Manage on it.
[en] On the Custom Settings - FunnelCake Instance page, click Edit.
[en] In the Instance field, type the full URL for your FunnelCake domain name.
[en] For example: If your company name was hooli, you would enter https://hooli.getfunnelcake.com(make sure there is no '/' at the end of the URL).
[en] Click Save.
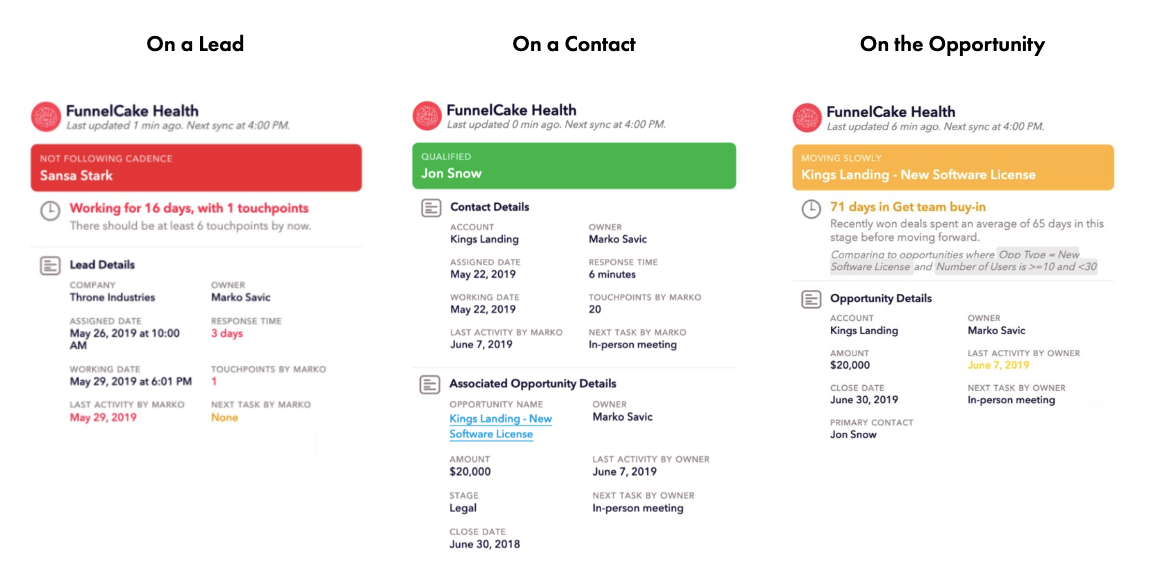
[en] Setting up Health Cards
[en] Health cards highlight risks on opportunities, leads, and contacts in Salesforce, such as lack of activity or spending longer than average in a given stage.
[en] To install a card on the Opportunity Page:
[en] In the top right corner of Salesforce, click Setup.
[en] Down the left side of your screen you will see a menu with a Quick Find search box. Type "opportunities" into the search box, and then under Opportunities, select Page Layouts.
[en] Click Edit on the page layout you would like to add the health card to.
[en] In the layout menu at the top of the page, scroll down the left hand column and click Visualforce Pages.
[en] You should see an item called FunnelCakeOppCard. Drag this down onto your opportunity page below. We recommend putting it in the Opportunity Information section.
[en] Click the FunnelCakeOppCard you just dragged down, and then click on the wrench in the top right corner to edit its properties.
[en] Enter in a Height (in pixels) of 600, and check the box for Show Scrollbars. Click OK, and then in the layout menu at the top of you screen click Save.
[en] To install a card on the Lead page:
[en] In the top right corner of Salesforce, click Setup.
[en] Down the left side of your screen you will see a menu with a Quick Find search box. Type "leads" into the search box, and then under Lead, select Page Layouts.
[en] Click Edit on the page layout you would like to add the health card to.
[en] In the layout menu at the top of the page, scroll down the left hand column and click Visualforce Pages.
[en] You should see an item called FunnelCakeLeadCard. Drag this down onto your lead page below. We recommend putting it in the Lead Information section.
[en] Click the FunnelCakeLeadCard you just dragged down, and then click on the wrench in the top right corner to edit its properties.
[en] Enter in a Height (in pixels) of 600, and check the box for Show Scrollbars. Click OK, and then in the layout menu at the top of you screen click Save.
[en] To install a card on the Contact page:
[en] In the top right corner of Salesforce, click Setup.
[en] Down the left side of your screen you will see a menu with a Quick Find search box. Type "contacts" into the search box, and then under Contacts, select Page Layouts.
[en] Click Edit on the page layout you would like to add the health card to.
[en] In the layout menu at the top of the page, scroll down the left hand column and click Visualforce Pages.
[en] You should see an item called FunnelCakeContactCard. Drag this down onto your lead page below. We recommend putting it in the Contact Information section.
[en] Click the FunnelCakeContactCard you just dragged down, and then click on the wrench in the top right corner to edit its properties.
[en] Enter in a Height (in pixels) of 600, and check the box for Show Scrollbars. Click OK, and then in the layout menu at the top of you screen click Save.
[en] Setting up the Timeline View
[en] The timeline view brings together everything that's happened to an opportunity, lead, or contact in one view.
[en] In one view, the opportunity timeline includes:
[en] Any activity that's occurred on the opportunity, contact, or account. It can be broken down by activity that occurred before the opportunity was created, while it was open, or after it was closed.
[en] When changes to deal size, owner, and close date occurred.
[en] When the opportunity moved through different stages of the funnel.
[en] In one view, the lead/contact timeline includes:
[en] Any activity that's occurred on the lead or contact, and if it occurred before the lead was assigned, during it being worked, or after it was qualified, unqualified, or put in nurture.
[en] When the lead was assigned, what activity was done while it was being worked, and when it was qualified, unqualified, or put in nurture.
[en] To install the timeline on the Opportunity page:
[en] In the top right corner of Salesforce, click Setup.
[en] Down the left side of your screen you will see a menu with a Quick Find search box. Type "opportunities" into the search box, and then under Opportunities, select Page Layouts.
[en] Click Edit on the page layout you would like to add the timeline to.
[en] In the layout menu at the top of the page, scroll down the left hand column and click Visualforce Pages.
[en] You should see an item called FunnelCakeOppHistoryCard. Drag this down onto your opportunity page below. We recommend creating a new section that has a layout of 1-column.
[en] Click the FunnelCakeOppHistoryCard you just dragged down, and then click on the wrench in the top right corner to edit its properties.
[en] Enter in a Height (in pixels) of 700, and check the box for Show Scrollbars. Click OK, and then in the layout menu at the top of you screen click Save.
[en] To install the timeline on the Lead page:
[en] In the top right corner of Salesforce, click Setup.
[en] Down the left side of your screen you will see a menu with a Quick Find search box. Type "leads" into the search box, and then under Lead, select Page Layouts.
[en] Click Edit on the page layout you would like to add the health card to.
[en] In the layout menu at the top of the page, scroll down the left hand column and click Visualforce Pages.
[en] You should see an item called FunnelCakeLeadHistoryCard. Drag this down onto your lead page below. We recommend creating a new section that has a layout of 1-column.
[en] Click the FunnelCakeLeadHistoryCard you just dragged down, and then click on the wrench in the top right corner to edit its properties.
[en] Enter in a Height (in pixels) of 700, and check the box for Show Scrollbars. Click OK, and then in the layout menu at the top of you screen click Save.
[en] To install the timeline on the Contact page:
[en] In the top right corner of Salesforce, click Setup.
[en] Down the left side of your screen you will see a menu with a Quick Find search box. Type "contacts" into the search box, and then under Contacts, select Page Layouts.
[en] Click Edit on the page layout you would like to add the health card to.
[en] In the layout menu at the top of the page, scroll down the left hand column and click Visualforce Pages.
[en] You should see an item called FunnelCakeContactHistoryCard. Drag this down onto your lead page below. We recommend creating a new section that has a layout of 1-column.
[en] Click the FunnelCakeContactHistoryCard you just dragged down, and then click on the wrench in the top right corner to edit its properties.
[en] Enter in a Height (in pixels) of 700, and check the box for Show Scrollbars. Click OK, and then in the layout menu at the top of you screen click Save.
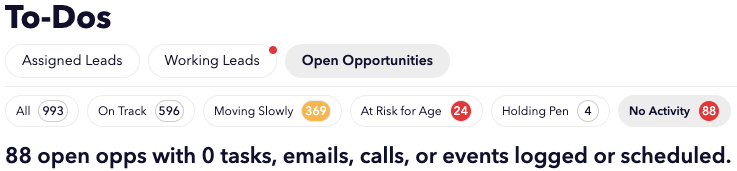
[en] Setting up the To-Do list for reps
[en] The to-do list is a great way for reps to understand where all health risks are on their leads and opportunities. We recommend putting it on their home page so they can always be on top of issues.
[en] In the top right corner of Salesforce, click Setup.
[en] Down the left side of your screen you will see a menu with a Quick Find search box. Type "home page layouts" into the search box, and then under Home, select Home Page Layouts.
[en] Click Edit on the page layout you would like to add the To-Do List to.
[en] Under Select Wide Components to Show, check the box for FunnelCakeHomeTodo. Click Next.
[en] Under Wide (Right) Column, pick the position you'd like the To-Do List to appear on the page. Then, click Save.
[en] Setting up other FunnelCake reports on home pages
[en] Beyond the To-Do List, you can set up other FunnelCake report like Risk from Age or Pipeline Flow on your home page.
[en] To install a report on a home page:
[en] In the top right corner of Salesforce, click Setup.
[en] Down the left side of your screen you will see a menu with a Quick Find search box. Type "home page layouts" into the search box, and then under Home, select Home Page Layouts.
[en] Click Edit on the page layout you would like to add a report to.
[en] Under Select Wide Components to Show, check the box for the report you would like to add. Click Next.
[en] Under Wide (Right) Column, pick the position you'd like the report to appear on the page. Then, click Save.